Bed Builder: Brandon Kalicki
A lot of people leave comments to thank me for ideas. Some write to ask questions or seek advice. But Brandon Kalicki is different. He's the first person to actually say I gave him confidence to build something he never thought he was capable of doing. He's also the first person to build TWO of my projects!
Confidence
That word means a lot to me. In fact, I paused while writing this post to write a complete blog post about confidence. Feel free to read it now and come back. I'll wait.
The fact that Brandon got confidence from one of my videos is like The Holy Grail to me! It's my mission! I was compelled to share his story and pictures with you.
Two Kids, Two Beds
Here are Brandon's responses to the various questions I asked him after he reached out to me initially:
What country and city are you from?
I'm from Watonga, Oklahoma, USA.
How did you find the bed video?
I first saw the video shared on Facebook and I thought, “that's brilliant, and easy. I think I can do that.” The more I dug into the platform bed I discovered the website and the various projects including the “Bed Bridge” project which is what my daughter wanted to do.
Who did you build the bed for? What is their age?
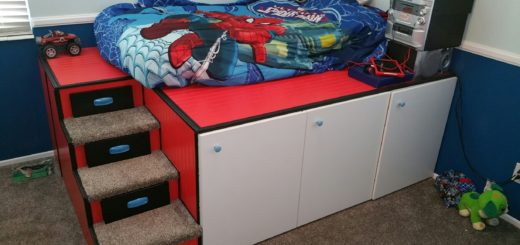
I built the Platform Bed for my Son, Joseph age 12, replacing a loft bed that he used for a number of years. His bedroom is the smallest in the house so we needed to maximize floor space utility and more storage.
The Bed Bridge, was something my daughter, Kaitlynn age 13, wanted because she LOVES books and needed more places to store her books and again floor space was an issue.
Were you planning a new bed or room makeover before you saw the video?
We weren't necessarily planning something immediately however being that our kids were at transition ages they were wanting to move from “kids” rooms to “teen” rooms and this provided us a cost effective strategy to do something sooner rather than later.
Which project came first?
Interestingly enough my wife, Shanna, had seen bridge bookcases but they were always so cost prohibitive. I originally wanted to do the platform bed for my daughter but she preferred to have the bridge…I looked at the design and thought about how to modify it for a twin bed and then asked my son if he wanted it. The bed bridge came first because I felt it would be the easier undertaking, and I wanted to build up some Handy-Dad momentum before tackling the platform bed. 😉
What size mattress did you use?
My son has a standard twin size bed (38″x75″).
Did you attach it to the wall or make it free-standing?
I attached it to the wall using 1×4 pine boards and the 2.5″ coarse thread dry wall screws you recommended in your videos.
Which method did you use to reinforce the step cabinets?
I used a 1×12 as a vertical support.
Where is the IKEA store where you bought the cabinets? Tell me about your experience buying the cabinets.
Our closest IKEA is located in the Dallas area (about 250 miles away) but we actually made trips to IKEA on consecutive weekends to buy the cabinets/shelves. We couldn't fit everything the first time. Overall our experience was good but I did have some sticker shock after checking out (I classify that as standard Dad problems).
How long did it take you to build?
For each project I took a day to assemble the units from IKEA and then another 1-2 days to wrap up the project.
Tell me about your experience building the bed.
I'm going to start with the Bed Bridge…we did 3 Billy bookcases for cost/floor space savings. The build went really well…I assembled the shelves and placed the towers, then had to cut the bottom off of the 3rd Billy so it could sit flush with the other shelves. The biggest problem I had was how to secure the bridge to the wall. What I ended up doing was getting help to hold it in place while I attached some repurposed scraps at the top into the studs. I used pieces of the bottom I cut off so I wouldn't have to worry about matching paint.
For the platform bed, my experience was pretty good overall. I honestly had watched the videos so many times and had sketched out a plan and design that the process went very smooth.
What, if anything, did you change from my design?
First off I changed it to accommodate a twin bed. Also, since we have carpet I had to raise the cabinets and per your suggestion from Q&A. I was going to use 2x4s but decided to use something bigger to provide more head room since this was going to be my sons “gaming room” my plan was to use 6×6 beams for the footing but when I got to Home Depot those were $20/beam and I saw some 4×6's that were only $12 so I went with that. I placed the 4×6 footing to be slightly longer than the bottom piece of the cabinet so that it would go about 1/2 way to the cabinet sides just for more support (hope that makes sense) also on the “passage” cabinet I placed a floating piece of extra 4×6 just to make sure we never accidentally have a knee go through the bottom.
What would you do differently next time?
Honestly at this point I don't think I would change anything, but that's mainly because I just finished it yesterday so I haven't discovered any flaws yet.
